To connect a MikroTik router to a VPSnet private network over WireGuard, add the site in the VPSnet control panel and download its .conf file, then on RouterOS 7 create a WireGuard interface with the private key from that file, add the VPN as its peer, give the interface the tunnel address and route each VPSnet network into it. Each step shows the WebFig screen (WinBox has the same menus) and the same setting as a Terminal command. Tested on RouterOS 7.25 with a fixed public IPv4 address, the router starting the connection.
Before you start
- In the VPSnet control panel open your VPN, choose Connect a site (router), pick MikroTik, keep WireGuard under Connect over and click Next. Enter the site’s networks. Leave Router’s public address for the tunnel (optional) empty when the router is behind NAT or its address changes: the router then starts the connection, which is how this guide was tested.
- Download the .conf file right away: it holds the router’s private key and is shown once.
- Later you find the values again under Router setup on the site’s row: the VPN address and port, the VPN public key, the tunnel address, the addresses to send into the tunnel (AllowedIPs), the keepalive and the same commands with Copy all commands; pasted together, they change nothing when the router already has an interface of that name.
The pictures show example values from documentation ranges. Enter the values from your own router recipe.
1. Create the WireGuard interface
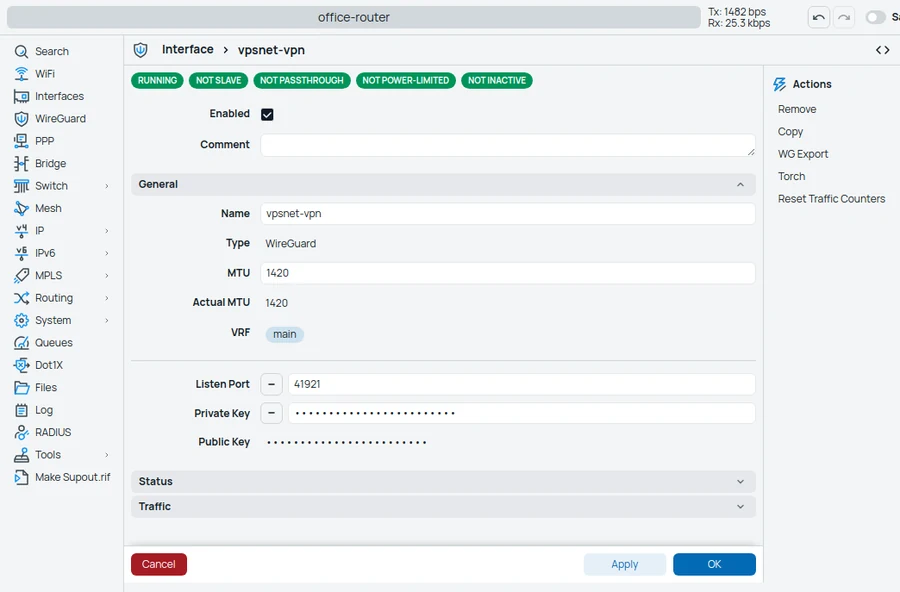
WireGuard > WireGuard > New
Name it after the site, as the panel’s commands do (here vilnius-branch; the pictures show vpsnet-vpn), and paste the private key from the .conf file; the public key fills in by itself. Set Listen Port only if the panel shows one (when you entered the router’s address).
| Field | Value |
|---|---|
| Name | vilnius-branch |
| MTU | 1420 |
| Private Key | the private key from the .conf file |
| Listen Port | only the port the panel shows, if any |
In Terminal:
/interface wireguard add name=vilnius-branch private-key="PRIVATE_KEY_FROM_THE_CONF_FILE"
2. Add the VPN as a peer
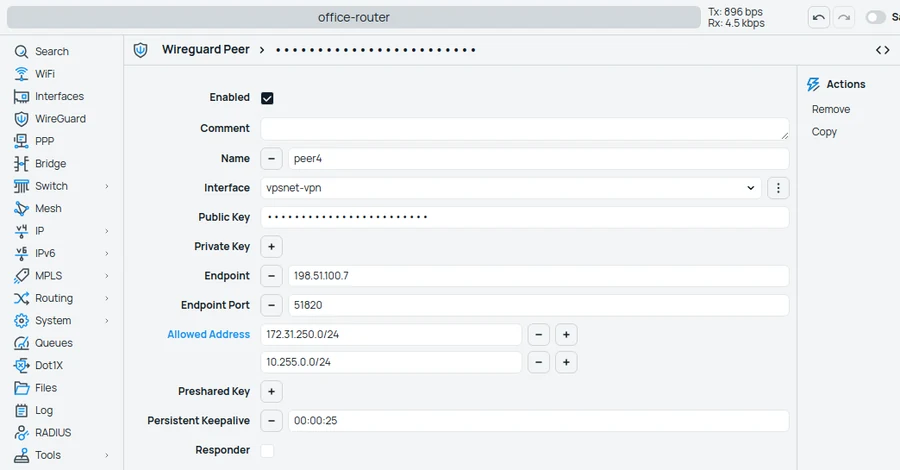
WireGuard > Peers > New
Enter every AllowedIPs address from the panel as Allowed Address. The keepalive keeps the connection open, also from behind NAT.
| Field | Value |
|---|---|
| Interface | vilnius-branch |
| Public Key | the VPN public key |
| Endpoint | the VPN address |
| Endpoint Port | the VPN port (51820) |
| Allowed Address | the AllowedIPs addresses |
| Persistent Keepalive | 00:00:25 |
In Terminal:
/interface wireguard peers add interface=vilnius-branch public-key="VPN_PUBLIC_KEY" endpoint-address=198.51.100.7 endpoint-port=51820 allowed-address=172.31.250.0/24,10.255.0.0/24 persistent-keepalive=25s
3. Give the interface its tunnel address
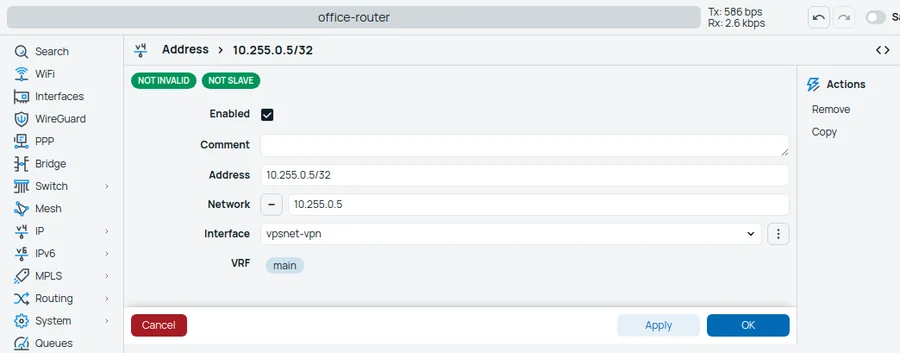
IP > Addresses > New
The router’s tunnel address from the panel, with /32.
| Field | Value |
|---|---|
| Address | the router’s tunnel address (/32) |
| Interface | vilnius-branch |
In Terminal:
/ip address add address=10.255.0.5/32 interface=vilnius-branch
4. Route the VPSnet networks
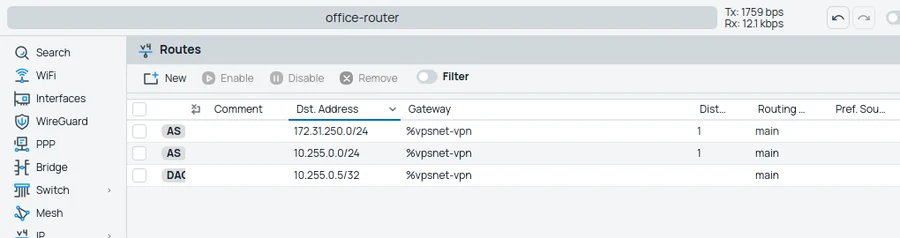
IP > Routes > New
One route for each AllowedIPs address, with the WireGuard interface as gateway.
| Field | Value |
|---|---|
| Dst. Address | each AllowedIPs address |
| Gateway | vilnius-branch |
In Terminal:
/ip route add dst-address=172.31.250.0/24 gateway=vilnius-branch
/ip route add dst-address=10.255.0.0/24 gateway=vilnius-branch
5. Check the connection
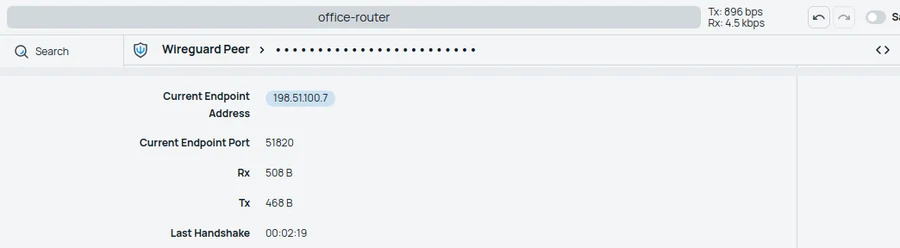
WireGuard > Peers
Last Handshake is under 2 minutes and Rx and Tx grow. Then ping a VPSnet server’s private address from an office computer.
| Field | Value |
|---|---|
| Last Handshake | under 2 minutes |
In Terminal:
/interface wireguard peers print detail where interface=vilnius-branch
Check and troubleshoot
- In the panel, open the site and click Test tunnel: it checks that the router answers, the keys match and traffic passes.
- No handshake: check the endpoint address and port, the VPN public key and that the private key came from the .conf file. If you set a listen port, allow it in IP > Firewall > Filter Rules (input).
- Handshake but no ping: check the peer’s Allowed Address and the routes, and that traffic into vilnius-branch is not masqueraded.
FAQ
Which RouterOS versions does this guide cover?
It was set up and tested on RouterOS 7.25 (CHR) with a fixed public IPv4 address, the router starting the connection. WireGuard is part of RouterOS 7; RouterOS 6 has none.
Where do I get the private key?
Only in the .conf file the panel gives you for the site. It is shown once.
My router is behind NAT. Does it still work?
Yes. The router opens the connection and the keepalive keeps it open.
Can several sites reach each other?
Yes, when “Sites can reach each other” is on for the VPN. The other sites’ networks are then added to AllowedIPs: open Router setup again and add them on the router.
Do I need NAT for the tunnel?
No. The VPSnet servers see the office computers’ own addresses.