To connect a MikroTik router to a VPSnet private network over IPsec, add the site in the VPSnet control panel, then on RouterOS 7 create the IPsec profile, proposal, peer, the identity with the pre-shared key and one policy per network pair, keep that traffic out of NAT and allow it in the firewall. RouterOS IPsec is policy-based, so no route is needed. Each step shows the WebFig screen (WinBox has the same menus) and the same setting as a Terminal command. Tested on RouterOS 7.25 with a fixed public IPv4 address.
Before you start
- In the VPSnet control panel open your VPN, choose Connect a site (router), pick MikroTik, choose IPsec IKEv2 under Connect over and click Next. Enter the site’s networks and your router’s public address.
- Copy the pre-shared key right away: it is shown once.
- Keep the site’s configuration open, tab CLI (copy-paste): it has your VPN address, networks and names filled in. The quickest way is to paste those commands into Terminal, or to upload the .rsc download under Files and run /import. The steps below set the same values one by one.
The pictures show example values from documentation ranges. Enter the values from your own router recipe.
1. Phase 1: profile
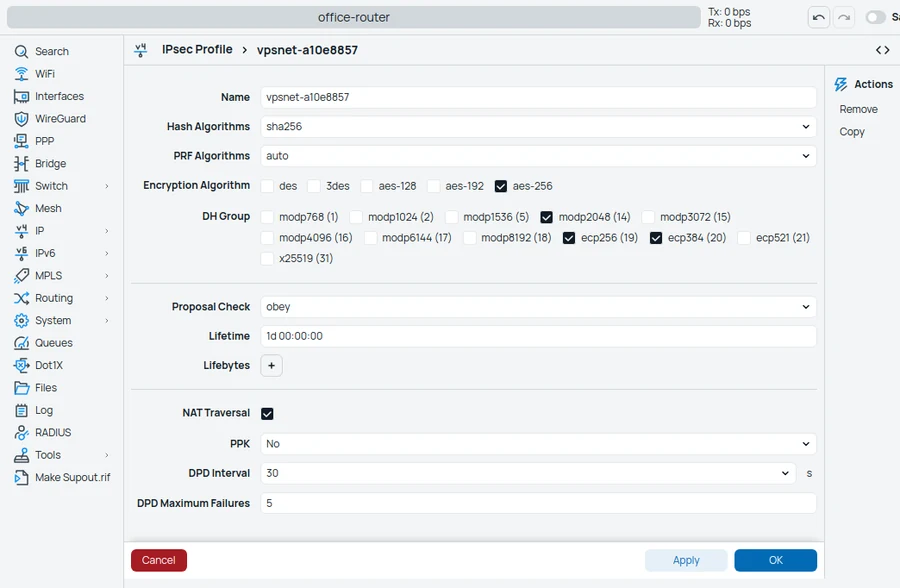
IP > IPsec > Profiles > New
RouterOS 7 does not offer GCM for IKE itself, so phase 1 uses AES-256 with SHA-256; the data traffic still uses AES-256-GCM (step 2).
| Field | Value |
|---|---|
| Name | the tunnel name from the configuration (for example vpsnet-a10e8857) |
| Hash Algorithms | sha256 |
| PRF Algorithms | auto |
| Encryption Algorithm | aes-256 |
| DH Group | ecp256 (19), ecp384 (20), modp2048 (14) |
| Proposal Check | obey |
| Lifetime | 1d 00:00:00 |
| NAT Traversal | On |
| DPD Interval | 30 s |
| DPD Maximum Failures | 5 |
In Terminal:
/ip ipsec profile add name=vpsnet-a10e8857 enc-algorithm=aes-256 hash-algorithm=sha256 prf-algorithm=auto dh-group=ecp256,ecp384,modp2048 lifetime=1d nat-traversal=yes dpd-interval=30s dpd-maximum-failures=5 proposal-check=obey
2. Phase 2: proposal
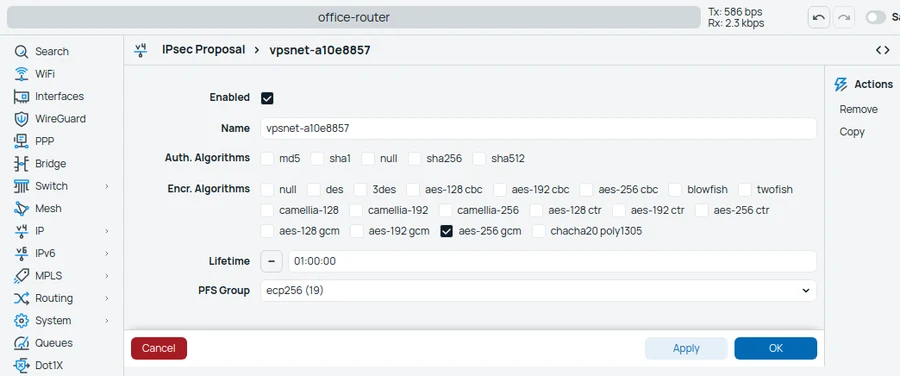
IP > IPsec > Proposals > New
Tick only aes-256 gcm and no Auth. Algorithm: GCM authenticates by itself. RouterOS takes one PFS group; the configuration uses ecp256.
| Field | Value |
|---|---|
| Name | the tunnel name from the configuration (for example vpsnet-a10e8857) |
| Auth. Algorithms | none |
| Encr. Algorithms | aes-256 gcm |
| Lifetime | 01:00:00 |
| PFS Group | ecp256 (19) |
In Terminal:
/ip ipsec proposal add name=vpsnet-a10e8857 enc-algorithms=aes-256-gcm auth-algorithms="" pfs-group=ecp256 lifetime=1h
3. Add the VPN as a peer
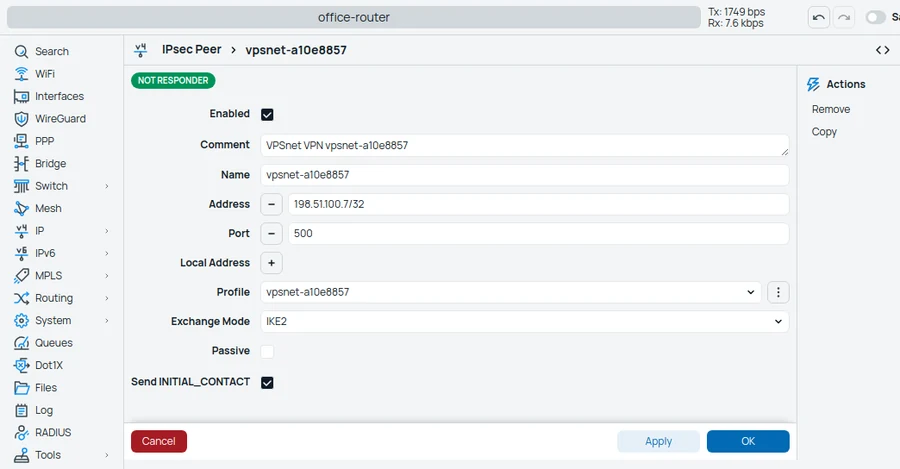
IP > IPsec > Peers > New
Address is the VPN address with /32. Leave Passive unticked: either side may start the tunnel.
| Field | Value |
|---|---|
| Name | the tunnel name from the configuration (for example vpsnet-a10e8857) |
| Address | the VPN address/32 |
| Port | 500 |
| Profile | the one from step 1 |
| Exchange Mode | IKE2 |
| Send INITIAL_CONTACT | On |
In Terminal:
/ip ipsec peer add name=vpsnet-a10e8857 address=198.51.100.7/32 port=500 exchange-mode=ike2 profile=vpsnet-a10e8857 send-initial-contact=yes passive=no comment="VPSnet VPN vpsnet-a10e8857"
4. Pre-shared key
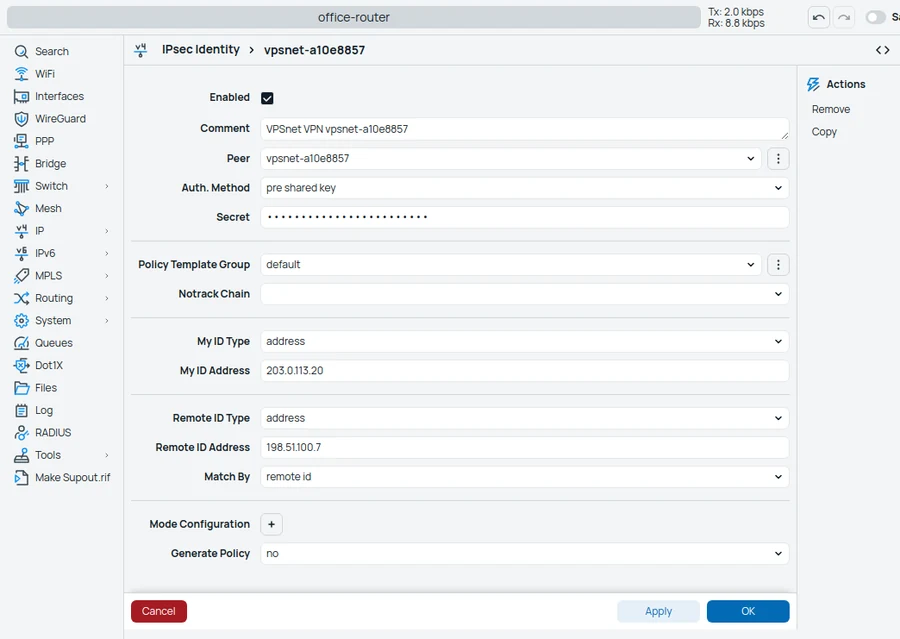
IP > IPsec > Identities > New
Paste the key exactly: 64 characters, no spaces. My ID is your router’s public address, Remote ID the VPN address.
| Field | Value |
|---|---|
| Peer | the one from step 3 |
| Auth. Method | pre shared key |
| Secret | the pre-shared key (shown once) |
| My ID Type | address |
| My ID Address | your router’s public IPv4 address |
| Remote ID Type | address |
| Remote ID Address | the VPN address |
| Generate Policy | no |
In Terminal:
/ip ipsec identity add peer=vpsnet-a10e8857 auth-method=pre-shared-key secret="KEY_FROM_THE_PANEL" my-id=address:203.0.113.20 remote-id=address:198.51.100.7 generate-policy=no comment="VPSnet VPN vpsnet-a10e8857"
5. One policy per network pair
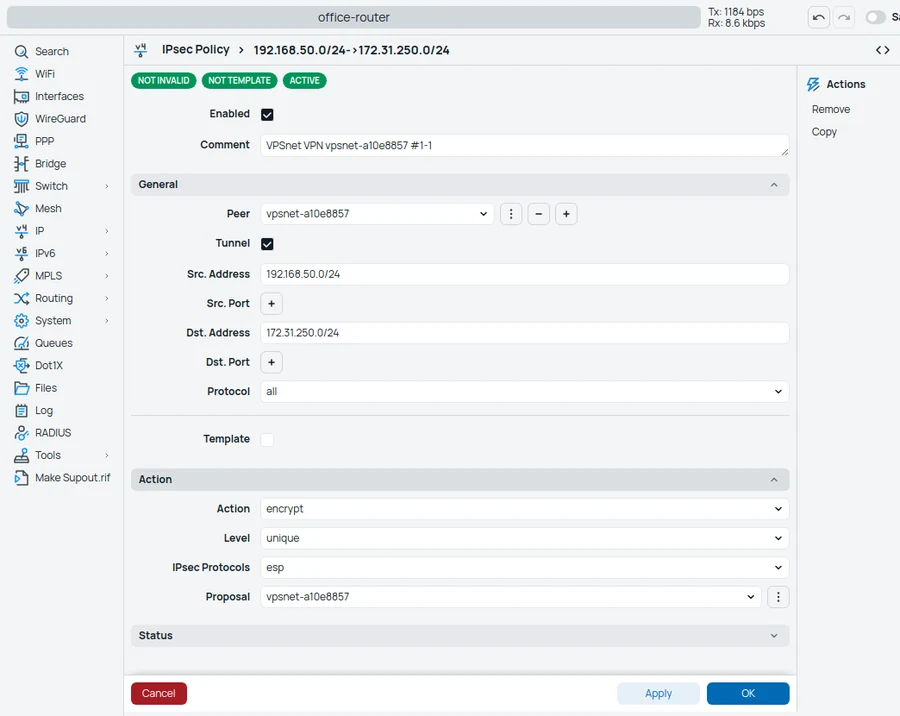
IP > IPsec > Policies > New
Add one policy for each office network and each VPSnet network in the configuration: the office network as source, the VPSnet network as destination. Tick Tunnel; under Action choose encrypt, unique and the proposal from step 2.
| Field | Value |
|---|---|
| Peer | the one from step 3 |
| Tunnel | On |
| Src. Address | your office network |
| Dst. Address | a VPSnet network from the configuration |
| Protocol | all |
| Action | encrypt |
| Level | unique |
| IPsec Protocols | esp |
| Proposal | the one from step 2 |
In Terminal:
/ip ipsec policy add peer=vpsnet-a10e8857 tunnel=yes src-address=192.168.50.0/24 dst-address=172.31.250.0/24 protocol=all proposal=vpsnet-a10e8857 action=encrypt level=unique comment="VPSnet VPN vpsnet-a10e8857 #1-1"
6. Keep VPSnet traffic out of NAT
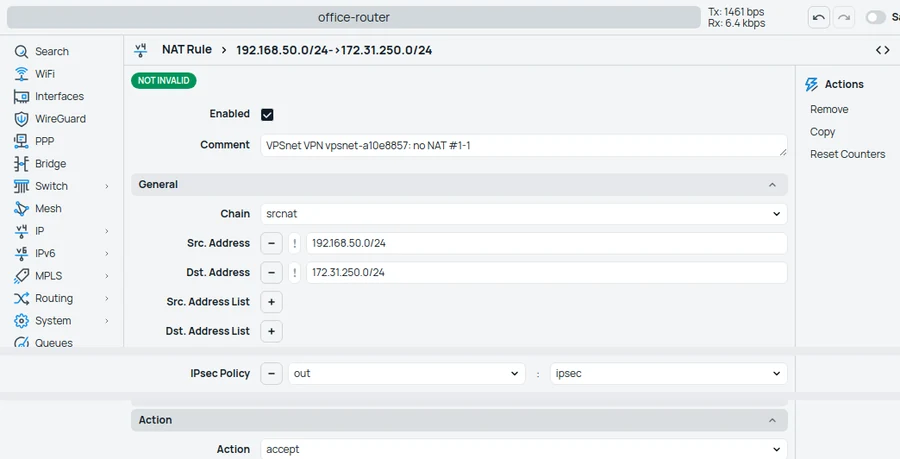
IP > Firewall > NAT > New
This rule must be above your masquerade rule, otherwise the traffic is translated to your WAN address and never matches the policy. After saving, drag it to the top of the list (in Terminal the move command does it). One rule per network pair.
| Field | Value |
|---|---|
| Chain | srcnat |
| Src. Address | your office network |
| Dst. Address | a VPSnet network from the configuration |
| IPsec Policy | out : ipsec |
| Action | accept |
In Terminal:
/ip firewall nat add chain=srcnat action=accept src-address=192.168.50.0/24 dst-address=172.31.250.0/24 ipsec-policy=out,ipsec comment="VPSnet VPN vpsnet-a10e8857: no NAT #1-1"
/ip firewall nat move [find comment="VPSnet VPN vpsnet-a10e8857: no NAT #1-1"] 0
7. Allow the tunnel in the firewall
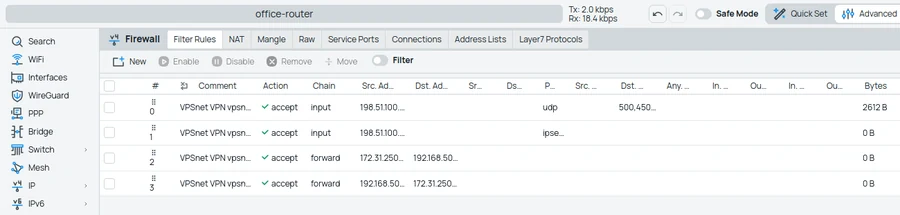
IP > Firewall > Filter Rules
Four accept rules at the top of the list: IKE and NAT-T (UDP 500 and 4500) and ESP from the VPN address into the router, and the decrypted traffic both ways between the office network and the VPSnet network.
| Chain | Rule |
|---|---|
| input | protocol udp, Dst. Port 500,4500, Src. Address the VPN address – accept |
| input | protocol ipsec-esp, Src. Address the VPN address – accept |
| forward | VPSnet network → office network, IPsec Policy in : ipsec – accept |
| forward | office network → VPSnet network, IPsec Policy out : ipsec – accept |
In Terminal:
/ip firewall filter add chain=input action=accept protocol=udp src-address=198.51.100.7 dst-port=500,4500 comment="VPSnet VPN vpsnet-a10e8857: IKE/NAT-T"
/ip firewall filter move [find comment="VPSnet VPN vpsnet-a10e8857: IKE/NAT-T"] 0
/ip firewall filter add chain=input action=accept protocol=ipsec-esp src-address=198.51.100.7 comment="VPSnet VPN vpsnet-a10e8857: ESP"
/ip firewall filter move [find comment="VPSnet VPN vpsnet-a10e8857: ESP"] 0
/ip firewall filter add chain=forward action=accept src-address=172.31.250.0/24 dst-address=192.168.50.0/24 ipsec-policy=in,ipsec comment="VPSnet VPN vpsnet-a10e8857: VPSnet -> office #1-1"
/ip firewall filter move [find comment="VPSnet VPN vpsnet-a10e8857: VPSnet -> office #1-1"] 0
/ip firewall filter add chain=forward action=accept src-address=192.168.50.0/24 dst-address=172.31.250.0/24 ipsec-policy=out,ipsec comment="VPSnet VPN vpsnet-a10e8857: office -> VPSnet #1-1"
/ip firewall filter move [find comment="VPSnet VPN vpsnet-a10e8857: office -> VPSnet #1-1"] 0
8. Clamp the TCP MSS
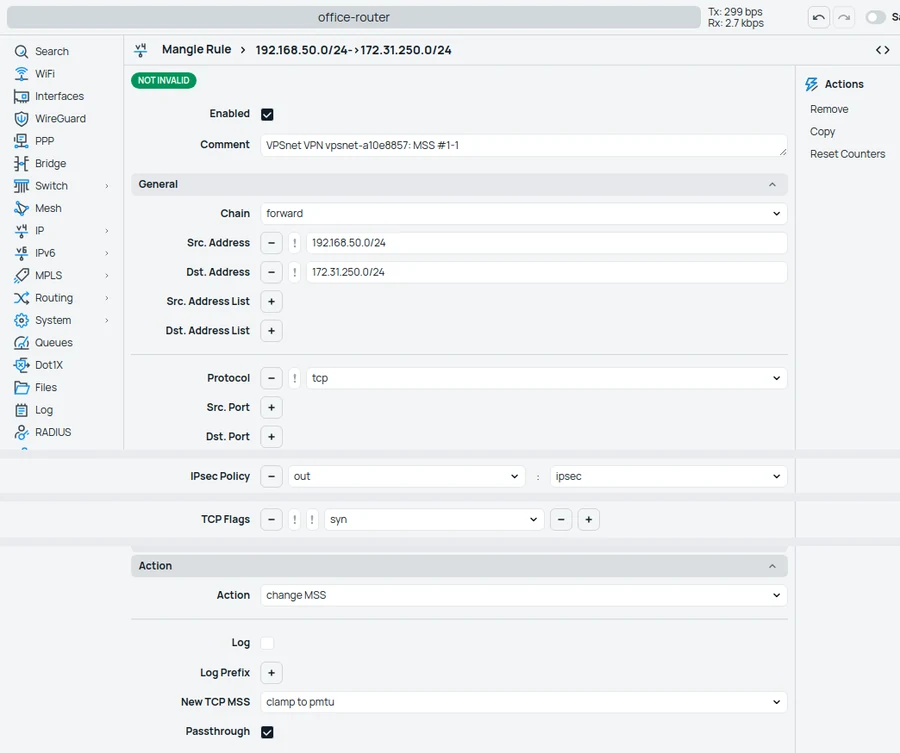
IP > Firewall > Mangle > New
The tunnel MTU is 1400. This rule keeps TCP connections to VPSnet from stalling on large packets.
| Field | Value |
|---|---|
| Chain | forward |
| Src. Address | your office network |
| Dst. Address | a VPSnet network from the configuration |
| Protocol | tcp |
| TCP Flags | syn |
| IPsec Policy | out : ipsec |
| Action | change MSS |
| New TCP MSS | clamp to pmtu |
| Passthrough | On |
In Terminal:
/ip firewall mangle add chain=forward action=change-mss new-mss=clamp-to-pmtu protocol=tcp tcp-flags=syn src-address=192.168.50.0/24 dst-address=172.31.250.0/24 ipsec-policy=out,ipsec comment="VPSnet VPN vpsnet-a10e8857: MSS #1-1"
/ip firewall mangle move [find comment="VPSnet VPN vpsnet-a10e8857: MSS #1-1"] 0
9. Check the tunnel
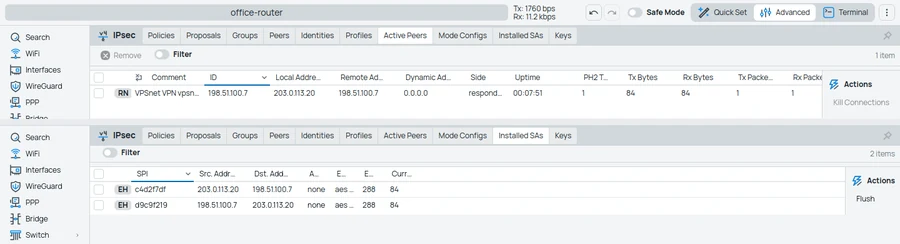
IP > IPsec > Active Peers, Installed SAs
Our VPN starts the tunnel within a minute. Active Peers shows the VPN established and Installed SAs a pair of aes-gcm SAs. Then ping a VPSnet server’s private address from an office computer.
| Field | Value |
|---|---|
| State | established |
In Terminal:
/ip ipsec active-peers print
/ip ipsec installed-sa print proplist=spi,src-address,dst-address,state,enc-algorithm,current-bytes
Check and troubleshoot
- In the panel, open the site and click Test tunnel: it checks that the router answers, the keys match and traffic passes.
- No active peer: check the peer address, the key in the identity (pasted without spaces) and that the input rules for UDP 500, 4500 and ESP are above any drop rule. Log (topics ipsec) shows why a negotiation fails.
- Established but no ping: check that the policy has the office network as source and the VPSnet network as destination, and that the no-NAT rule is above masquerade.
FAQ
Which RouterOS versions does this guide cover?
It was set up and tested on RouterOS 7.25 (CHR) with a fixed public IPv4 address. RouterOS 6 is not covered.
Why is no route to VPSnet needed?
RouterOS IPsec is policy-based: the policies decide what is encrypted, so the office’s internet traffic stays as it is.
Can I use BGP over this tunnel?
Not with RouterOS: our VPN runs BGP only over a route-based tunnel, and RouterOS IPsec is policy-based. Use the policies.
My router’s public address changes. Can I still connect?
This guide covers a fixed address, the case we tested. Tick “The address changes” when you add the site: the configuration then shows the settings for that case, and your router has to start the tunnel itself.
I lost the pre-shared key. What now?
The key is shown once. In the panel, open the site and choose “Rotate key”: a new key is made and shown once, and the old one stops working the next time the router connects.
Do I need NAT for the tunnel?
No. The VPSnet servers see the office computers’ own addresses.