To connect OPNsense to a VPSnet private network, add the site in the VPSnet control panel, then set up a route-based IPsec IKEv2 tunnel (VTI) on OPNsense with the values from the panel’s router recipe: the tunnel interface, the connection, authentication, the child, the key, a gateway, a route and a firewall rule. This guide was tested on OPNsense 26.7 with a fixed public IPv4 address.
Before you start
- In the VPSnet control panel open your VPN, choose Connect a site (router), pick OPNsense, choose IPsec IKEv2 under Connect over and click Next. Enter the site’s networks and your router’s public IPv4 address.
- Copy the pre-shared key right away: it is shown once.
- Keep the site’s Router recipe open, tab In the browser: it has your VPN address, tunnel addresses and networks filled in.
The pictures show example values from documentation ranges. Enter the values from your own router recipe.
1. Virtual tunnel interface
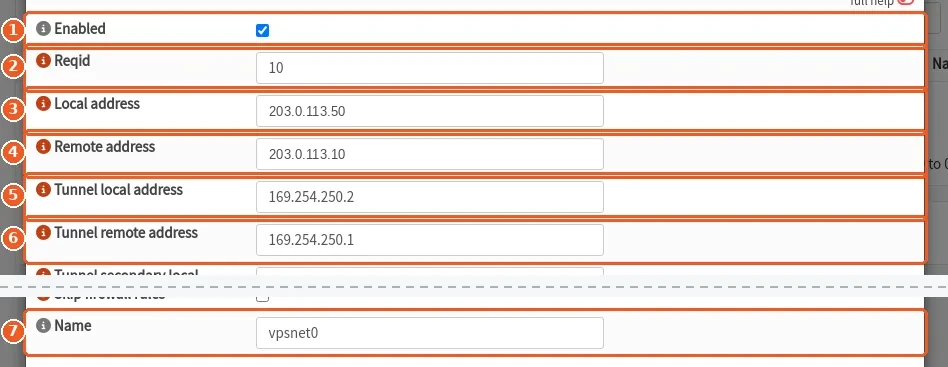
VPN > IPsec > Virtual Tunnel Interfaces > +
Keep the Reqid from the recipe unless this firewall already uses it; then use the same new number in step 5.
| # | Field | Value |
|---|---|---|
| 1 | Enabled | On |
| 2 | Reqid | the Reqid from the recipe |
| 3 | Local address | your router’s public IPv4 address |
| 4 | Remote address | the VPN address from the router recipe |
| 5 | Tunnel local address | the router’s tunnel address from the recipe (169.254.x.x) |
| 6 | Tunnel remote address | the VPN’s tunnel address from the recipe (169.254.x.x) |
| 7 | Name | the interface name from the recipe, for example vpsnet0 |
2. Connection (IKE)
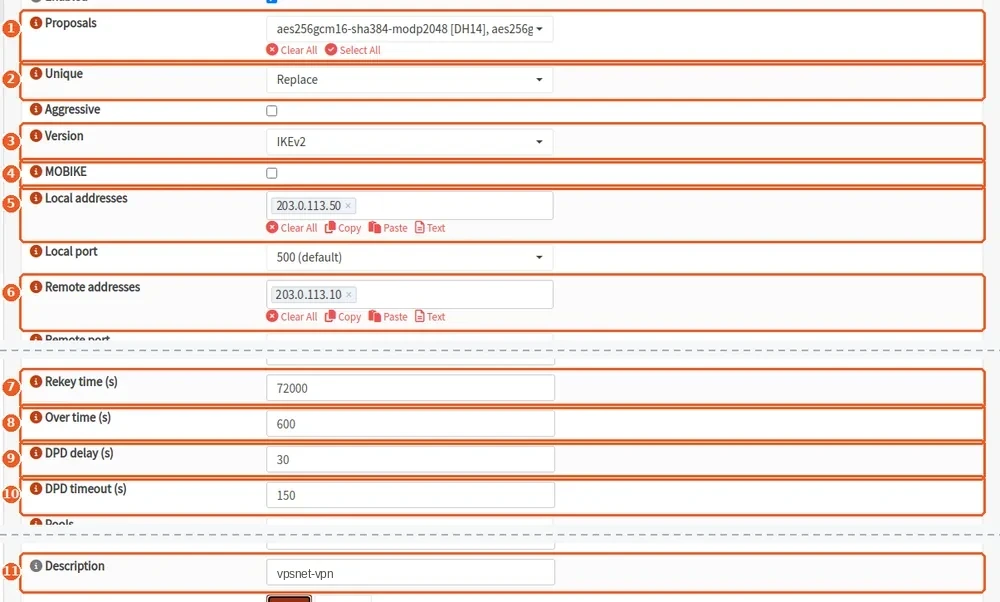
VPN > IPsec > Connections > +
Switch on advanced mode at the top of the form so that every field shows. Save.
| # | Field | Value |
|---|---|---|
| 1 | Proposals | aes256gcm16-sha384-ecp256, aes256gcm16-sha384-ecp384, aes256gcm16-sha384-modp2048 |
| 2 | Unique | Replace |
| 3 | Version | IKEv2 |
| 4 | MOBIKE | Off |
| 5 | Local addresses | your router’s public IPv4 address |
| 6 | Remote addresses | the VPN address from the router recipe |
| 7 | Rekey time (s) | 72000 (or the value in the recipe) |
| 8 | Over time (s) | 600 (or the value in the recipe) |
| 9 | DPD delay (s) | 30 (or the value in the recipe) |
| 10 | DPD timeout (s) | 150 |
| 11 | Description | the tunnel name from the router recipe |
3. Local authentication

VPN > IPsec > Connections > Local Authentication > +
Under Local Authentication of the connection click + and save.
| # | Field | Value |
|---|---|---|
| 1 | Authentication | Pre-Shared Key |
| 2 | ID | your router’s public IPv4 address |
4. Remote authentication

VPN > IPsec > Connections > Remote Authentication > +
Under Remote Authentication click + and save.
| # | Field | Value |
|---|---|---|
| 1 | Authentication | Pre-Shared Key |
| 2 | Id | the VPN address from the router recipe |
5. Child (ESP)
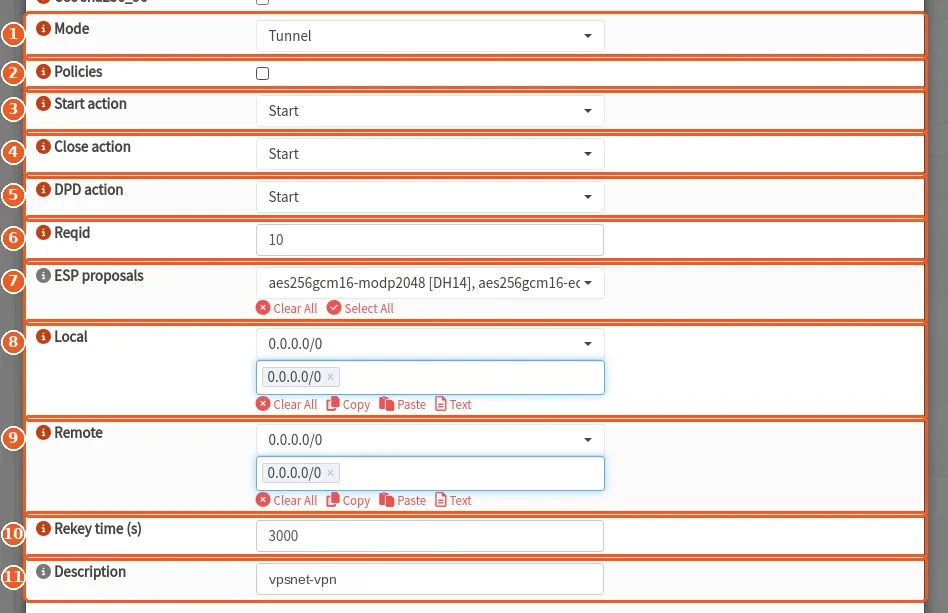
VPN > IPsec > Connections > Children > +
Keep advanced mode on. Policies stay off: the tunnel interface carries the traffic. Use the same Reqid as in step 1. Save.
| # | Field | Value |
|---|---|---|
| 1 | Mode | Tunnel |
| 2 | Policies | Off |
| 3 | Start action | Start |
| 4 | Close action | Start |
| 5 | DPD action | Start |
| 6 | Reqid | the Reqid from the recipe |
| 7 | ESP proposals | aes256gcm16-ecp256, aes256gcm16-ecp384, aes256gcm16-modp2048 |
| 8 | Local | 0.0.0.0/0 |
| 9 | Remote | 0.0.0.0/0 |
| 10 | Rekey time (s) | 3000 (or the value in the recipe) |
| 11 | Description | the tunnel name from the router recipe |
6. Pre-shared key
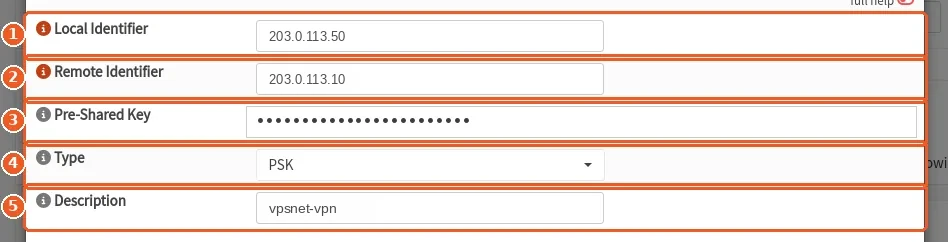
VPN > IPsec > Pre-Shared Keys > +
Add the key with the same identifiers as the two authentications. Save.
| # | Field | Value |
|---|---|---|
| 1 | Local Identifier | your router’s public IPv4 address |
| 2 | Remote Identifier | the VPN address from the router recipe |
| 3 | Pre-Shared Key | the pre-shared key (shown once) |
| 4 | Type | PSK |
| 5 | Description | the tunnel name from the router recipe |
7. Switch IPsec on

VPN > IPsec > Connections
Tick Enable IPsec and click Apply.
| # | Field | Value |
|---|---|---|
| 1 | Enable IPsec | On |
8. Enable the tunnel interface

Interfaces > [the tunnel interface]
OPNsense 26 creates the interface from the VTI in step 1. Open that interface, enable it and save. Do not add another tunnel interface.
| # | Field | Value |
|---|---|---|
| 1 | Enable | On |
| 2 | Description | the interface name from the recipe, for example vpsnet0 |
9. Tunnel gateway
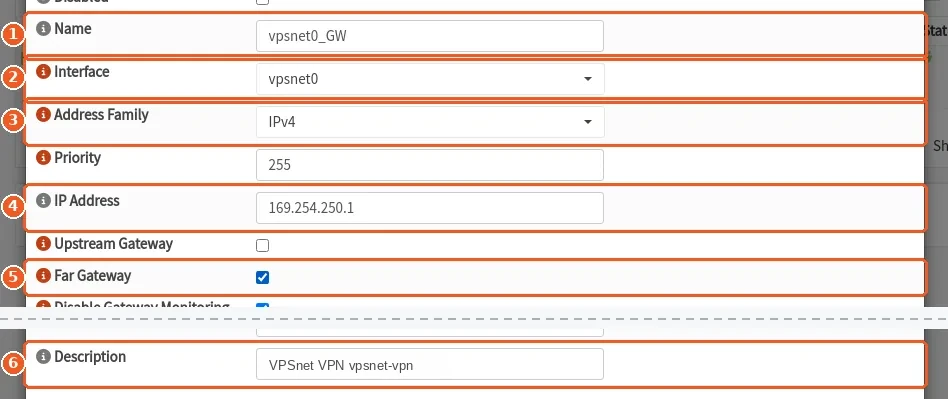
System > Gateways > Configuration > +
Add a gateway on the tunnel interface. Save and apply.
| # | Field | Value |
|---|---|---|
| 1 | Name | the interface name with _GW, for example vpsnet0_GW |
| 2 | Interface | the interface name from the recipe, for example vpsnet0 |
| 3 | Address Family | IPv4 |
| 4 | IP Address | the VPN’s tunnel address from the recipe (169.254.x.x) |
| 5 | Far Gateway | On |
| 6 | Description | VPSnet VPN |
10. Route the VPSnet networks

System > Routes > Configuration > +
Add one route for each VPSnet network in the recipe. Save and apply.
| # | Field | Value |
|---|---|---|
| 1 | Enabled | On |
| 2 | Network Address | a VPSnet network from the recipe |
| 3 | Gateway | the tunnel gateway |
| 4 | Description | VPSnet VPN |
11. Allow traffic from VPSnet to the office
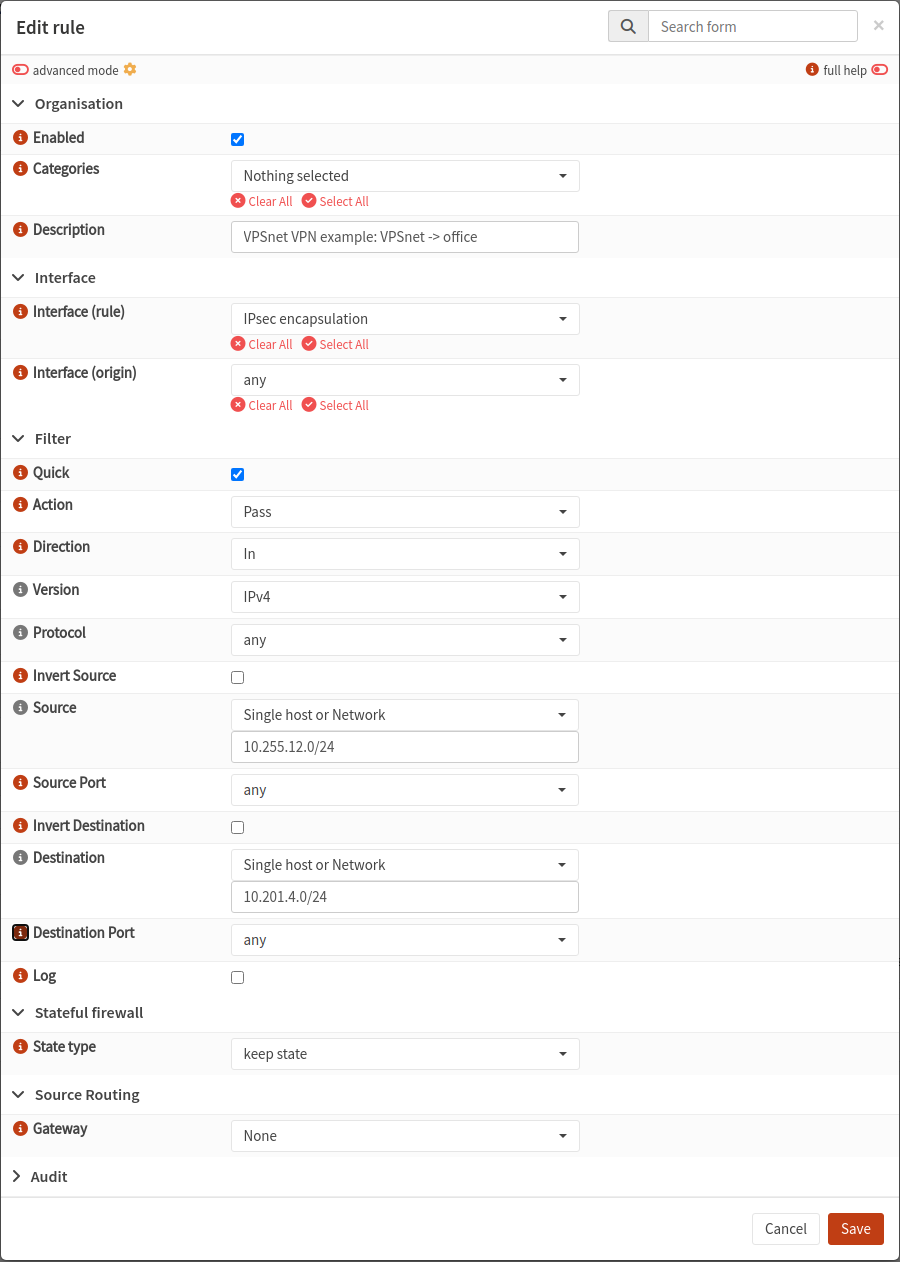
Firewall > Rules > +
OPNsense 26.7 has one Firewall > Rules view. Add a rule on IPsec encapsulation (the default IPsec filtering) and leave Interface (origin) at any. One rule per office network. Save and apply.
| Field | Value |
|---|---|
| Interface (rule) | IPsec encapsulation |
| Action | Pass |
| Direction | In |
| Version | IPv4 |
| Protocol | any |
| Source | a VPSnet network from the recipe |
| Destination | your office network |
| Description | VPSnet VPN: VPSnet -> office |
Check and troubleshoot
- In the panel, open the site and click Test tunnel: it checks that the router answers, the keys match and traffic passes.
- No connection: check that Enable IPsec is ticked and that the pre-shared key’s identifiers equal the Local and Remote Authentication IDs. VPN > IPsec > Log File says why a negotiation fails.
- Connected but no traffic: the child must have Policies off and the same Reqid as the tunnel interface; check the route and the rule on IPsec encapsulation.
FAQ
Which OPNsense versions does this guide cover?
It was set up and tested on OPNsense 26.7 with a fixed public IPv4 address. Other versions may name or place some fields differently.
My router’s public address changes. Can I still connect?
This guide covers a fixed address. Tick “The address changes” when you add the site: the router recipe then shows the settings for that case, and your router has to start the tunnel itself.
Why a route-based (VTI) tunnel?
The VPN sends traffic by routes. With a tunnel interface you add or remove VPSnet networks by changing routes only.
I lost the pre-shared key. What now?
The key is shown once. In the panel, open the site and choose “Rotate key”: a new key is made and shown once, and the old one stops working the next time the router connects.
Do I need NAT for the tunnel?
No. The VPSnet servers see the office computers’ own addresses.