To connect a FortiGate to a VPSnet private network, add the site in the VPSnet control panel, then create a custom route-based IPsec IKEv2 tunnel on the FortiGate with the values from the panel’s router recipe, add address objects, a static route and two firewall policies. This guide was tested on FortiOS 8.0.2 with a fixed public IPv4 address.
Before you start
- In the VPSnet control panel open your VPN, choose Connect a site (router), pick FortiGate and click Next. Enter the site’s networks and your router’s public IPv4 address.
- Copy the pre-shared key right away: it is shown once.
- Keep the site’s Router recipe open, tab In the browser: it has your VPN address, tunnel addresses and networks filled in.
The pictures show example values from documentation ranges. Enter the values from your own router recipe.
1. Create the tunnel
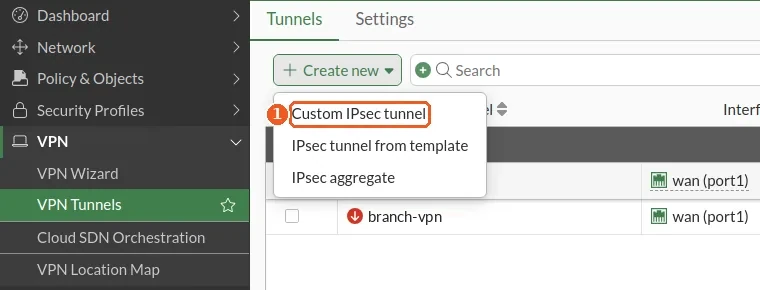
VPN > VPN Tunnels > Create new
Click Create new and choose Custom IPsec tunnel: the tunnel form opens.
| # | Field | Value |
|---|---|---|
| 1 | Custom IPsec tunnel | choose it |
2. Tunnel: Network
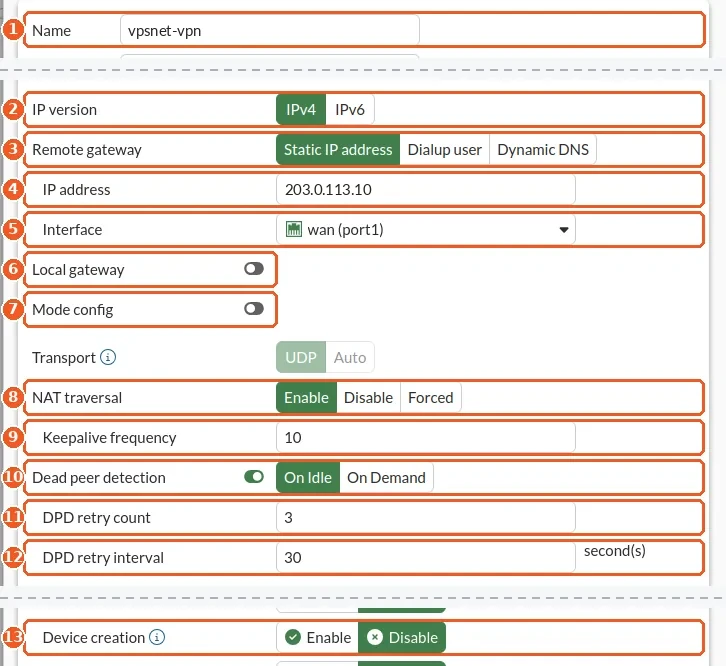
VPN > VPN Tunnels > Custom IPsec tunnel > Network
The name is at most 15 characters: it is also the name of the tunnel interface. Device creation is under Advanced network settings.
| # | Field | Value |
|---|---|---|
| 1 | Name | the tunnel name from the router recipe |
| 2 | IP version | IPv4 |
| 3 | Remote gateway | Static IP address |
| 4 | IP address | the VPN address from the router recipe |
| 5 | Interface | your WAN interface |
| 6 | Local gateway | Off |
| 7 | Mode config | Off |
| 8 | NAT traversal | Enable |
| 9 | Keepalive frequency | 10 |
| 10 | Dead peer detection | On Idle |
| 11 | DPD retry count | 3 |
| 12 | DPD retry interval | 30 (or the value in the recipe) |
| 13 | Device creation | Disable |
3. Tunnel: Authentication

VPN > VPN Tunnels > Custom IPsec tunnel > Authentication
Paste the pre-shared key from the panel and choose IKE version 2.
| # | Field | Value |
|---|---|---|
| 1 | Method | Pre-shared Key |
| 2 | Pre-shared key | the pre-shared key (shown once) |
| 3 | IKE | Version 2 |
4. Tunnel: Phase 1 proposal
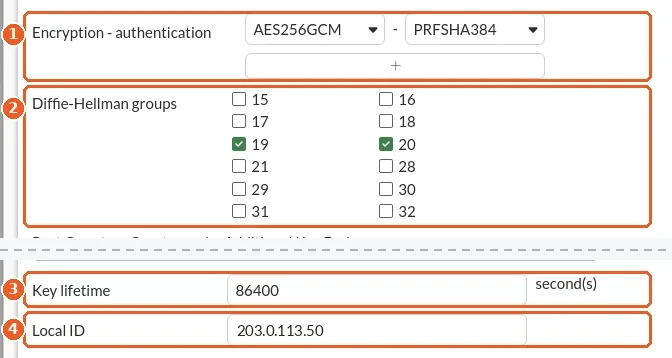
VPN > VPN Tunnels > Custom IPsec tunnel > Phase 1 proposal
Keep one encryption row and remove the others with ×. Tick only the two Diffie-Hellman groups.
| # | Field | Value |
|---|---|---|
| 1 | Encryption - authentication | AES256GCM - PRFSHA384 |
| 2 | Diffie-Hellman groups | 19, 20 |
| 3 | Key lifetime | 86400 (or the value in the recipe) |
| 4 | Local ID | your public IPv4 address (needed when the FortiGate is behind NAT) |
5. Phase 2 selector
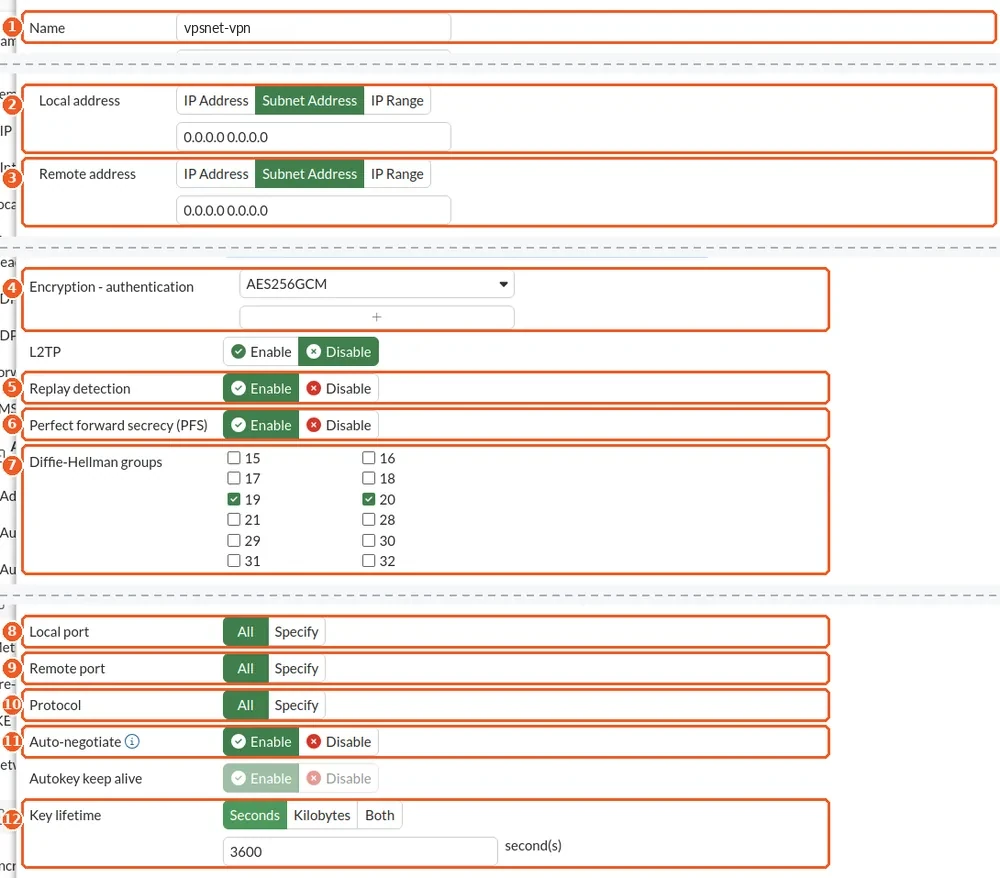
VPN > VPN Tunnels > Custom IPsec tunnel > Phase 2 selectors > Create new
The encryption and the rest are under Advanced. OK closes the selector; then click OK on the tunnel form as well.
| # | Field | Value |
|---|---|---|
| 1 | Name | the tunnel name from the router recipe |
| 2 | Local address | Subnet Address 0.0.0.0/0.0.0.0 |
| 3 | Remote address | Subnet Address 0.0.0.0/0.0.0.0 |
| 4 | Encryption - authentication | AES256GCM |
| 5 | Replay detection | Enable |
| 6 | Perfect forward secrecy (PFS) | Enable |
| 7 | Diffie-Hellman groups | 19, 20 |
| 8 | Local port | All |
| 9 | Remote port | All |
| 10 | Protocol | All |
| 11 | Auto-negotiate | Enable |
| 12 | Key lifetime | Seconds: 3600 (or the value in the recipe) |
6. Address of the office network
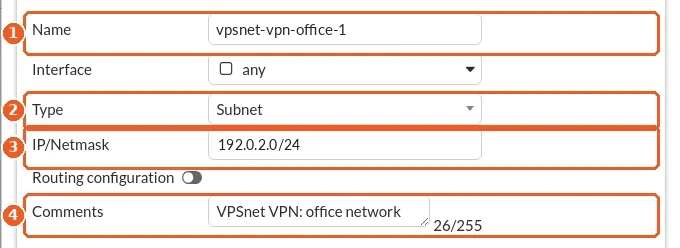
Policy & Objects > Addresses > Create new
One address object per office network: the recipe numbers them -office-1, -office-2 and so on.
| # | Field | Value |
|---|---|---|
| 1 | Name | the tunnel name with -office-1 |
| 2 | Type | Subnet |
| 3 | IP/Netmask | your office network |
| 4 | Comments | VPSnet VPN: office network |
7. Address of the VPSnet network
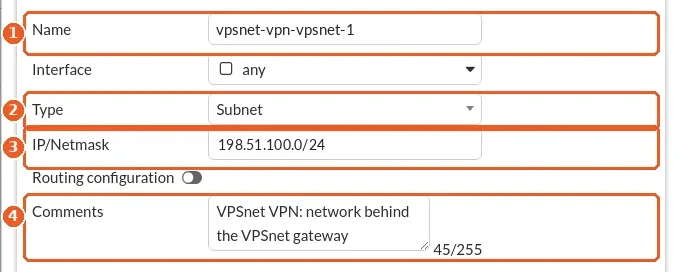
Policy & Objects > Addresses > Create new
One address object per VPSnet network in the recipe.
| # | Field | Value |
|---|---|---|
| 1 | Name | the tunnel name with -vpsnet-1 |
| 2 | Type | Subnet |
| 3 | IP/Netmask | a VPSnet network from the recipe |
| 4 | Comments | VPSnet VPN: network behind the VPSnet gateway |
8. Address group of the office
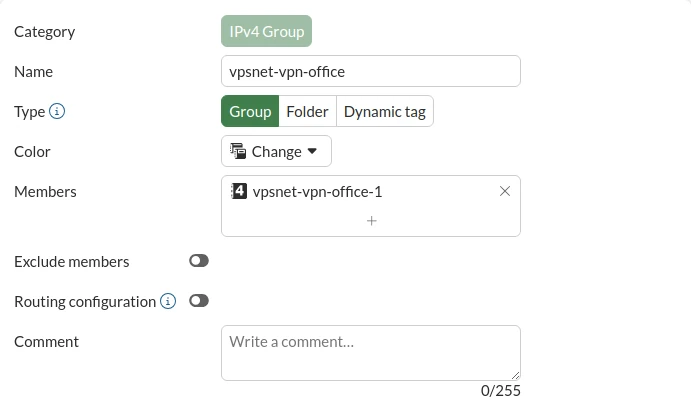
Policy & Objects > Addresses > Address Group > Create new
Make one group of the office address objects: the policies in steps 11 and 12 use it.
| Field | Value |
|---|---|
| Name | the tunnel name with -office |
| Type | Group |
| Members | every -office-N address |
9. Address group of VPSnet
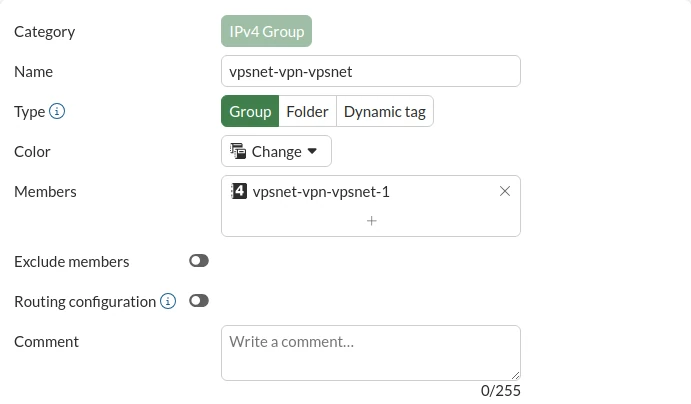
Policy & Objects > Addresses > Address Group > Create new
Make one group of the VPSnet address objects.
| Field | Value |
|---|---|
| Name | the tunnel name with -vpsnet |
| Type | Group |
| Members | every -vpsnet-N address |
10. Route the VPSnet networks
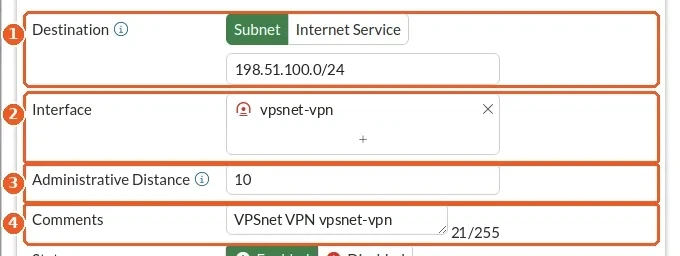
Network > Static Routes > Create new
One route per VPSnet network, through the tunnel interface. No gateway address is needed.
| # | Field | Value |
|---|---|---|
| 1 | Destination | a VPSnet network from the recipe |
| 2 | Interface | the tunnel |
| 3 | Administrative Distance | 10 |
| 4 | Comments | VPSnet VPN |
11. Policy: office to VPSnet
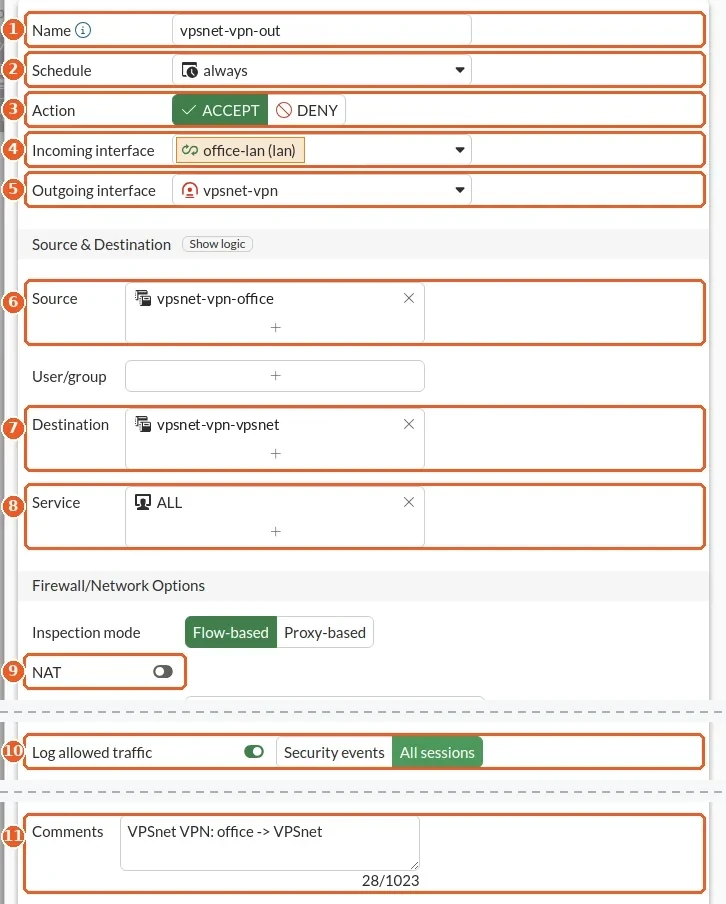
Policy & Objects > Firewall Policy > Create new
NAT stays off: the VPSnet servers see the office computers’ own addresses.
| # | Field | Value |
|---|---|---|
| 1 | Name | the tunnel name with -out |
| 2 | Schedule | always |
| 3 | Action | ACCEPT |
| 4 | Incoming interface | your LAN interface |
| 5 | Outgoing interface | the tunnel |
| 6 | Source | the office group |
| 7 | Destination | the VPSnet group |
| 8 | Service | ALL |
| 9 | NAT | Off |
| 10 | Log allowed traffic | All sessions |
| 11 | Comments | VPSnet VPN: office -> VPSnet |
12. Policy: VPSnet to office
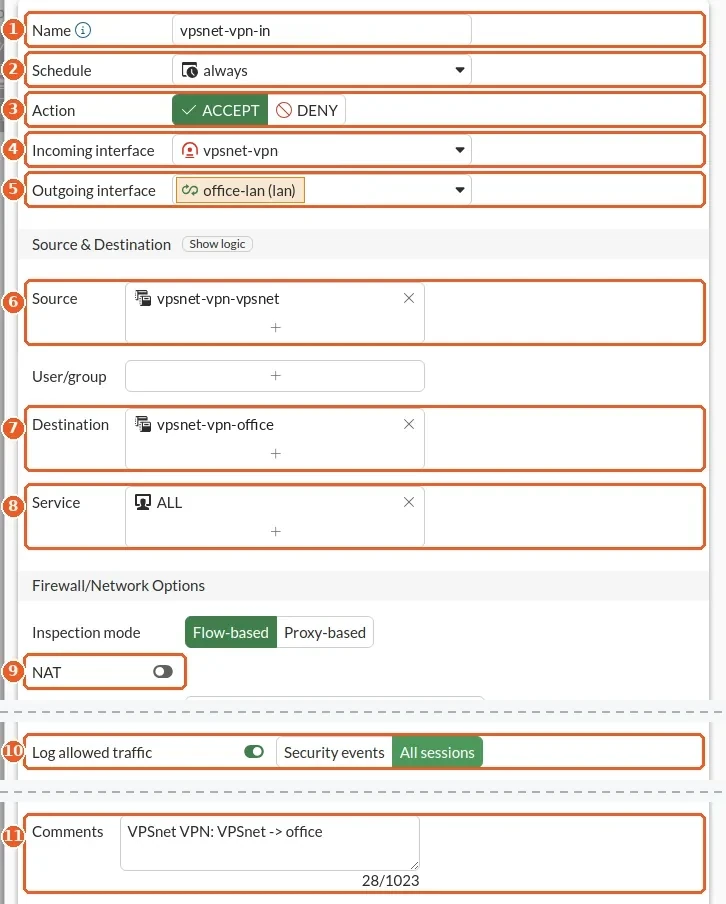
Policy & Objects > Firewall Policy > Create new
The same policy in the other direction.
| # | Field | Value |
|---|---|---|
| 1 | Name | the tunnel name with -in |
| 2 | Schedule | always |
| 3 | Action | ACCEPT |
| 4 | Incoming interface | the tunnel |
| 5 | Outgoing interface | your LAN interface |
| 6 | Source | the VPSnet group |
| 7 | Destination | the office group |
| 8 | Service | ALL |
| 9 | NAT | Off |
| 10 | Log allowed traffic | All sessions |
| 11 | Comments | VPSnet VPN: VPSnet -> office |
Check and troubleshoot
- In the panel, open the site and click Test tunnel: it checks that the router answers, the keys match and traffic passes.
- VPN > VPN Tunnels shows the tunnel as Up. If it stays down, select it and choose Bring up. On the command line,
diagnose vpn ike gateway list name TUNNEL(TUNNEL = the tunnel name) shows the negotiation. - Up but no ping: check the static route to the tunnel, both policies and that NAT is off.
FAQ
Which FortiGate (FortiOS) versions does this guide cover?
It was set up and tested on FortiGate (FortiOS) 8.0.2 with a fixed public IPv4 address. Other versions may name or place some fields differently.
Can I use the command line instead?
Yes. The router recipe has a “Commands” tab with the same settings, ready to paste; choose your FortiOS version there.
Why is the tunnel name at most 15 characters?
FortiOS uses it as the name of the tunnel interface, and interface names are at most 15 characters.
My router’s public address changes. Can I still connect?
This guide covers a fixed address, the case we tested. Tick “The address changes” when you add the site: the router recipe then shows the settings for that case, with the identity to enter as Local ID; the FortiGate starts the tunnel itself.
I lost the pre-shared key. What now?
The key is shown once. In the panel, open the site and choose “Rotate key”: a new key is made and shown once, and the old one stops working the next time the router connects.
Do I need NAT for the tunnel?
No. The VPSnet servers see the office computers’ own addresses.